30 Apr 2023 | Reading time: ~10 min
Android Hacking - How to set up an Android Penetration Testing Lab from scratch
#Android #Android-Studio #Android_SDK #cmdline-tools #sdkmanager #android-emulator #port-forwarding #android-certificates
Table of contents
- Introduction
- Writeup [TL;DR]
Introduction
In this post, we explore different ways to create a fully working environment for Android Penetration Testing and we create our setup using the SDK provided by Google (without installing Visual Studio), an Ubuntu machine running on WSL, and also an external virtual machine. Then, we set up the environment to allow communication between Android Virtual Devices and any other VMs. Finally, we explore how to import custom user certificates to intercept HTTPS requests on any version of Android.
Video
Writeup [TL;DR]
Introduction and summary
Hey! Today’s article is very basic. I’ll show you how I set up my Android pentesting environment without using either Genymotion or Android Studio, and then I will give you some little tips on how I managed to solve some little issues that prevented me from using external VMs with this setup. Finally, I will show you a simple trick to install Burpsuite certificates inside the system certificate store on newer Android devices.
Let’s begin!
From Genymotion to Android’s cmdline tools
Android application penetration testing requires multiple devices with different OS versions to analyze the behavior of the APK in any possible situation. We need a stable and responsive environment that gives us as much flexibility as possible.
Initially, my first Android emulator was Genymotion. It is easy to set up, supports bridging its network-card adapter instead of using NAT, and uses Virtualbox to emulate the various devices, which at the time was the emulation software I also used to run my Linux machines.
With time, however, I moved to VMWare, and I was forced to look for some Genymotion alternatives because of two main reasons. First, there were some coexistence problems between VMWare and Genymotion, and second, Genymotion started requiring a paid license to run the latest Android version required to test applications on modern systems.
To overcome these limitations, so, I decided to try the official Android emulator. The one thing that I really hated at the beginning was having to necessarily install Android Studio to use emulators.
Then I realized that Android also provides the android_sdk independently from Android Studio, allowing us to save many gigabytes of space.
This is my current setup, and now I will guide you in creating the same environment for yourself.
Digression on Corellium
A little disclaimer before starting: recently, a new service named Corellium1 broke into the scene as one of the best emulators and testing platforms out there. It allows emulating any Android or iOS device directly in the cloud and also supports ARM devices. The service is not free and is most suited for Enterprises, but it can also be paid based on consumption. If you are unsure, you can also require a free evaluation trial. As I said, it’s one of the most appreciated emulators, so it’s nice to know.
And in case you were wondering, no, I’m not at all affiliated with Corelium, otherwise I wouldn’t have created the environment that we’re going to reproduce.
Requirements download and introduction to the Android’s utilities
Let’s go back to our configuration: the first requirement we must install before setting up the environment is the Java Development Kit2, which we can download from the official Java website.
Once installed, we can download the Android command-line tools3 and Android platform tools4 from the official website. I downloaded the Windows version because my host operating system is Windows 11. On Linux and macOS, however, the process should be the same.
The cmdline-tools5 are the utilities required to download and install new SDK, create and run virtual devices, analyze APKs, and manage the environment.
PS C:\Users\bro\Desktop\android_tools\android_sdk\cmdline-tools\latest\bin> ls

Mode                 LastWriteTime         Length Name
----                 -------------         ------ ----
-a----        24/03/2023     20:18           2297 apkanalyzer.bat
-a----        24/03/2023     20:18           2288 avdmanager.bat
-a----        24/03/2023     20:18           2242 lint.bat
-a----        24/03/2023     20:18           2222 profgen.bat
-a----        24/03/2023     20:18           2222 retrace.bat
-a----        24/03/2023     20:18           2285 screenshot2.bat
-a----        24/03/2023     20:18           2295 sdkmanager.bat
Platform tools on the other side, are utilities that interface with the Android platform. The most useful and important ones for our needs are adb, sqlite and fastboot.
PS C:\Users\bro\Desktop\android_tools\android_sdk\platform-tools> ls

Mode                 LastWriteTime         Length Name
----                 -------------         ------ ----
-a----        30/03/2023     10:28        6021632 adb.exe
-a----        30/03/2023     10:28          97792 AdbWinApi.dll
-a----        30/03/2023     10:28          62976 AdbWinUsbApi.dll
-a----        30/03/2023     10:29         241664 dmtracedump.exe
-a----        30/03/2023     10:29         432640 etc1tool.exe
-a----        30/03/2023     10:29        1866240 fastboot.exe
-a----        30/03/2023     10:29          44032 hprof-conv.exe
-a----        30/03/2023     10:29         231594 libwinpthread-1.dll
-a----        30/03/2023     10:29         469504 make_f2fs.exe
-a----        30/03/2023     10:29         469504 make_f2fs_casefold.exe
-a----        30/03/2023     10:29           1157 mke2fs.conf
-a----        30/03/2023     10:29         747520 mke2fs.exe
-a----        30/03/2023     10:28        1073883 NOTICE.txt
-a----        30/03/2023     10:40           1367 package.xml
-a----        30/03/2023     10:29             38 source.properties
-a----        30/03/2023     10:29        1333760 sqlite3.exe
Android SDK download and AVD configuration
Alright! Now we must download and install the SDK we will use to create our virtual devices. First, follow the instructions specified in the official documentation6 to create a valid android_sdk environment. I created a specific folder named android_sdk and moved the various tools inside it, as mentioned in the sdkmanager manual.
Now we can use the sdkmanager utility to list and install any desired SDK. Using the --list command we can list all the available kit. The ones we are interested in are the “system-images”, however, feel free to experiment also with all the other SDKs.
Once we have chosen a specific SDK, we can install it. Completed the installation process, we can verify that the SDK has been correctly installed using the --list_installed command.
# list all the available sdk
 .\sdkmanager.bat --list
...
system-images;android-29;google_apis_playstore;x86                                       | 8            | Google Play Intel x86 Atom System Image
system-images;android-29;google_apis_playstore;x86_64                                    | 8            | Google Play Intel x86_64 Atom System Image
system-images;android-30;android-tv;x86                                                  | 4            | Android TV Intel x86 Atom System Image
system-images;android-30;android-wear-cn;arm64-v8a                                       | 10           | China version of Wear OS 3 - Preview ARM 64 v8a System Image
...

# install a specific sdk
.\sdkmanager.bat --install "system-images;android-29;google_apis;x86"

# list installed sdk
.\sdkmanager.bat --list_installed
Good, at this point we can create a virtual device using the just downloaded SDK.
We can create AVDs using the avdmanager utility7. We can list all the available devices using the list devices command, and we can create a virtual device using create avd with the -n flag to specify a custom name, -k to specify the desired Android API to install, and, eventually, -d to select a specific hardware profile.
In this way can create as many virtual devices we want, and we can list all of them using the list avd command.
# list all possible emulators
.\avdmanager.bat list devices

# create an emulator (C:\Users\name\.android\avd\)
.\avdmanager.bat --verbose create avd --force --name "generic_api29_google_apis_emulator" --package "system-images;android-29;google_apis;x86" --tag "google_apis" --abi "x86"
.\avdmanager.bat create avd -n "generic_api29_google_apis_emulator" -k "system-images;android-29;google_apis;x86"

# list installed avd
.\avdmanager.bat list avd
Available Android Virtual Devices:
    Name: generic_api29_google_apis_emulator
    Path: C:\Users\bro\.android\avd\generic_api29_google_apis_emulator.avd
  Target: Google APIs (Google Inc.)
          Based on: Android 10.0 (Q) Tag/ABI: google_apis/x86
  Sdcard: 512 MB

# delete emulator
 .\avdmanager.bat delete avd -n generic_api29_google_apis_emulator

# rename emulator
.\avdmanager.bat move avd -n generic_28 -r android-9_api-28
Ok, now we can try those emulators. We can use the emulator tool with the -list-avds option to list all the available devices, and we can run them using the -avd flag followed by the device’s name. We can also use the -scale parameter to increase or decrease the screen size, and -writable-system to run the emulator with write privileges for system partitions.
# list available emulators
PS C:\Users\bro\Desktop\android_tools\android_sdk\emulator> .\emulator.exe -list-avds
generic_api29_google_apis_emulator

# start a device
.\emulator.exe -avd generic_28

# start a device in writable mode with a bigger GUI
.\emulator.exe -avd generic_28 -writable-system -scale 0.6
If your emulator crashes when using the -writable-system flag, enable the Hyper-V support inside the Windows feature menù and eventually enable also the cold boot8 for your emulator.
The first time we run the emulator, we probably obtain some errors telling us that the tool doesn’t find the correct paths for the SDK folder.

This is because you are not subscribed to my channel and have not yet left a like. Of course, I’m joking, but it would be appreciated so much, so thanks in advance!
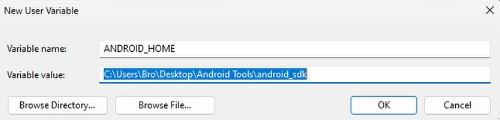
The reason why we get those errors is that we didn’t set the ANDROID_HOME environment variable when we downloaded the command-line tools. To fix this issue, we must create the ANDROID_HOME variable containing the android_sdk folder as the value.
Besides that, we also need to manually create a platforms folder inside android_sdk, otherwise, emulator.exe will not work again.
The folder structure must be as the one below:
> Directory: C:\Users\bro\Desktop\android_tools\android_sdk


Mode                 LastWriteTime         Length Name
----                 -------------         ------ ----
d-----        30/03/2023     11:22                .temp
d-----        30/03/2023     00:13                cmdline-tools
d-----        30/03/2023     00:55                emulator
d-----        30/03/2023     11:18                licenses
d-----        30/03/2023     00:54                patcher
d-----        30/03/2023     10:40                platform-tools
d-----        30/03/2023     10:29                platforms
d-----        30/03/2023     11:18                system-images
-a----        30/03/2023     11:24             16 .knownPackages
After rebooting the host machine, we should be able to start our Android Virtual Device.
Unfortunately, the emulator is not yet ready: the hardware buttons are broken. To enable them9, we must go to the .android folder, edit the config.ini file for every emulator we want to fix, and set the hw.keyboard and hw.mainKeys fields to yes.
$ edit ~/.android/avd/<emulator name>/config.ini
...
hw.keyboard=yes
...
hw.mainKeys=yes
...
If we run the emulator now, the buttons are working as expected and we can finally use it as a traditional physical device.
Current environment limitations
Up to this point, the main environment is ready.
We can use the adb binary contained in platform-tools to interact with our virtual devices, and we can even install some other tools, like frida, to expand our toolset. The only limitation is that we are forced to use our host system.
Linux users should not have problems using their host as a testing machine, so, the next part of the post is most suited for Windows users that maybe want to use external virtual machines for testing their apps.
By default, every emulator listens for incoming connections on ports 5554, 5555, or higher, but they are only bound to localhost and cannot be reached by other NATed devices. We can do some port-forwarding magic and make those ports available on all the other interfaces, but adb also requires a USB connection to work properly, so for this single tool, it is better to use the binary provided by the platform-tools.
Nevertheless, we can use frida as a better example to show how to set up all the forwarding rules for all the other necessities.
Frida can be divided into two main components: the frida-server and the frida-tools. In our example, we have a frida-server running on any emulator’s interface, but we wanna use the frida-tools installed inside an Ubuntu WSL machine instead of the ones installed on the Windows host system.
$ ./frida-server -l 0.0.0.0:10099
Configure different port-forwarding rules to overcome environment limitations
Ubuntu and Andriod cannot communicate with each other because they both use a NATed IP.
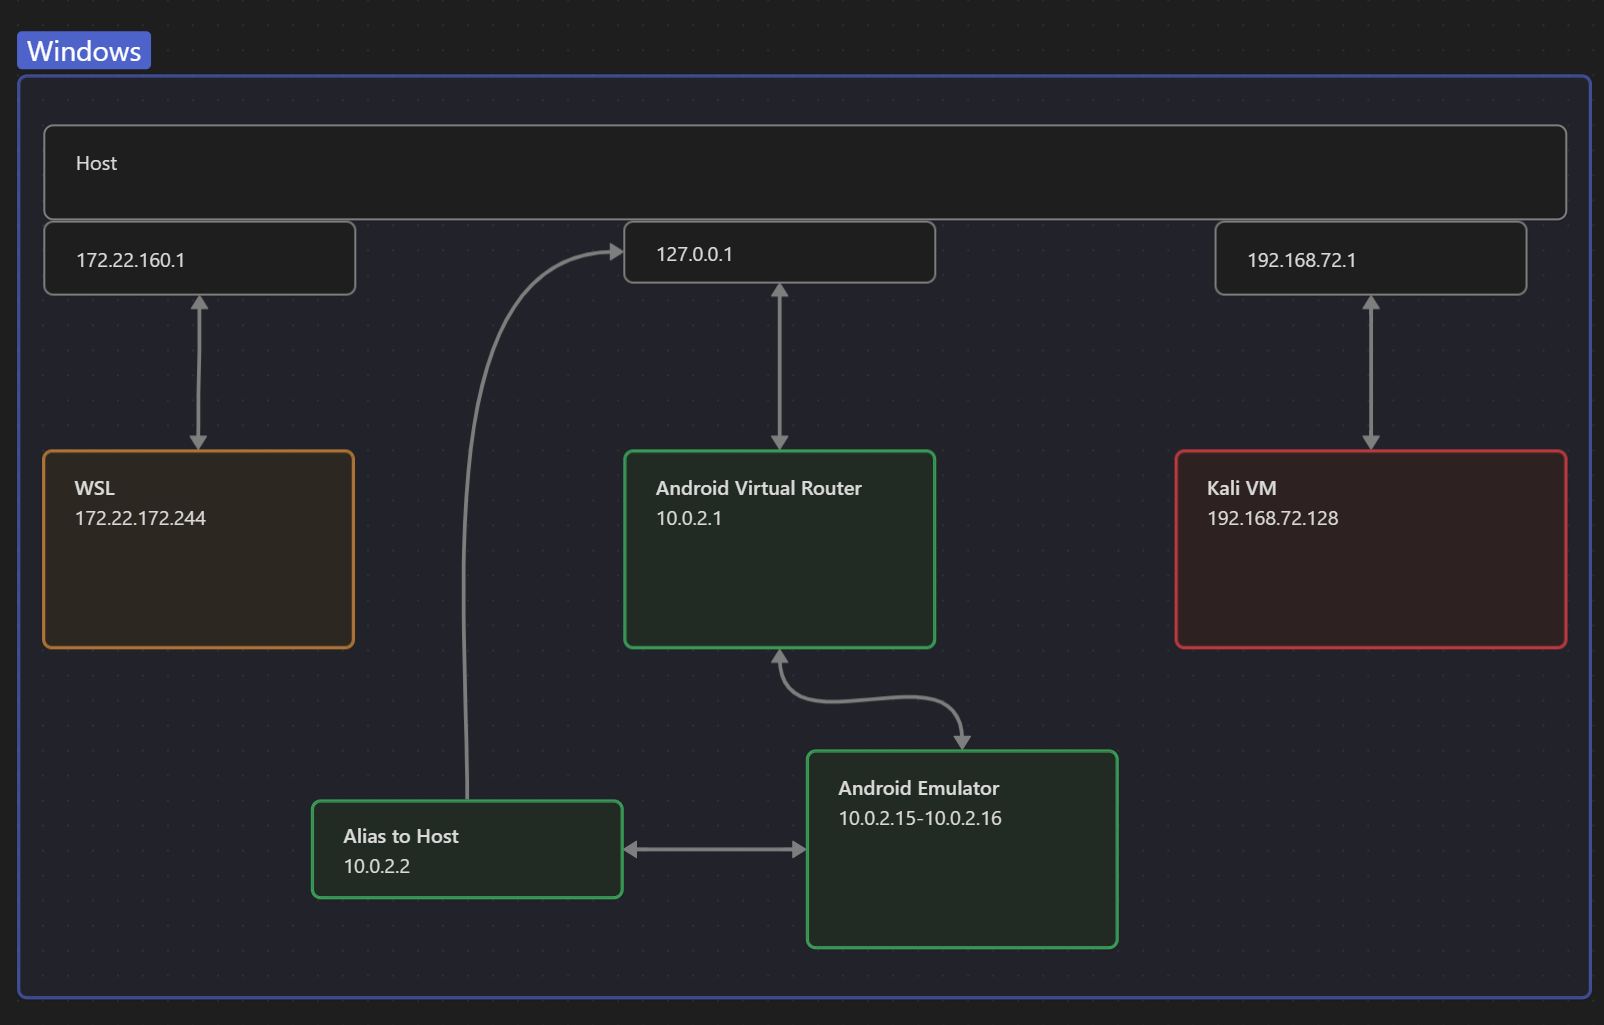
Ubuntu has an IP of 172.22.172.244 and uses 172.22.160.1 - which is our Windows host machine - as a gateway.
$ ip a
1: lo: <LOOPBACK,UP,LOWER_UP> mtu 65536 qdisc noqueue state UNKNOWN group default qlen 1000
    link/loopback 00:00:00:00:00:00 brd 00:00:00:00:00:00
    inet 127.0.0.1/8 scope host lo
       valid_lft forever preferred_lft forever
    inet6 ::1/128 scope host
       valid_lft forever preferred_lft forever
...
6: eth0: <BROADCAST,MULTICAST,UP,LOWER_UP> mtu 1500 qdisc mq state UP group default qlen 1000
    link/ether 00:15:5d:3b:4e:71 brd ff:ff:ff:ff:ff:ff
    inet 172.22.172.244/20
...
$ traceroute google.com
traceroute to google.com (142.251.209.46), 30 hops max, 60 byte packets
 1  0xbro.mshome.net (172.22.160.1)  0.429 ms  0.391 ms  0.364 ms
Android has an IP of 10.0.2.15 and uses a standardized infrastructure10, having a virtual router with IP 10.0.2.1 as a getaway.
Luckily, we can access this virtual router using telnet. The credentials required to access the routers can be found inside the .emulator_console_auth_token file. Once inside, we can set the desired port forwarding rules using the redir add command, followed by the protocol, the port to be opened on the host, and the emulator’s port bound to the rule.
# Auth credential
more C:\Users\bro\.emulator_console_auth_token
this_is_a_fake_password

# Login inside the virtual router and set port forwarding
telnet 127.0.0.1 5554
Android Console: you can find your <auth_token> in
'C:\Users\bro\.emulator_console_auth_token'
OK
auth this_is_a_fake_password
# For example, the following command sets up a redirection that handles all incoming TCP connections to your host (development) machine on 127.0.0.1:5000 and passes them through to the emulated system on 10.0.2.15:6000
redir add tcp:5000:6000
redir add tcp:10099:27042
PS C:\WINDOWS\system32> netstat -ano | findstr 10099
  TCP    127.0.0.1:10099        0.0.0.0:0              LISTENING       24980

# List active rules
redir list

# Delete a specific rule
redir del
Then, we must create another port forwarding rule, this time directly on Windows. This rule is responsible for connecting the port we just opened with redir add - and which is only available in localhost - with another port, this time available on all network interfaces.

For this rule, we can use the netsh interface portproxy command or, in the alternative, ssh.
PS> netsh interface portproxy add v4tov4 listenport=10100 listenaddress=0.0.0.0 connectport=10099 connectaddress=127.0.0.1

PS> netsh interface portproxy show all

Listen on ipv4:             Connect to ipv4:

Address         Port        Address         Port
--------------- ----------  --------------- ----------
0.0.0.0         10100       127.0.0.1       10099
Finally, I recommend disabling any firewall rule enabled on the Windows host so that our internal requests cannot be blocked.
Perfect, at this point the environment is completely set up. We can query the frida-server running on the Android device by targeting the WSL gateway IP on the port opened on the Windows host. If we have configured everything correctly we should receive the output from frida and thus communicate with our device.
We can do the same thing if we need to connect the Android emulator to a virtual machine.
I know is a tricky setup, but someday it may be useful.
Import custom certificates inside Android >=10
At this point, the last thing we need to do is import the burpsuite certificate within the system certificate store. I already talked about certificate stores during the “Android Application Pinning Bypass” video11, so check it out for more details.
By default, the system certificate store is a read-only file system and it’s pre-populated during the device boot. Luckily, an article12 by mitmproxy shows a fantastic step-by-step procedure that really fits the bill and that we can follow. It shows how to generate a valid certificate for Android, but most importantly shows how to disable the secure boot verification in order to remount the read-only partitions this time with write privileges.
# convert burpsuite certificate from der to cer/pem/crt
openssl x509 -inform der -in burp-free.der -out burp-free.cer

# extract the hash to be used for the certificate name
openssl x509 -inform PEM -subject_hash_old -in burp-free.cer | head -1
9a5ba575
cp burp-free.cer 9a5ba575.0

# install the certificate inside the system certificate store
.\emulator.exe -avd <avd_name_here> -writable-system
.\adb.exe root
.\adb.exe disable-verity
.\adb.exe reboot
.\adb.exe root
.\adb.exe remount
.\adb.exe push 9a5ba575.0 /system/etc/security/cacerts
.\adb.exe shell chmod 644 /system/etc/security/cacerts/9a5ba575.0
.\adb.exe reboot

# or

.\emulator.exe -avd <avd_name_here> -writable-system
.\adb.exe root
.\adb.exe shell avbctl disable-verification
.\adb.exe reboot
.\adb.exe root
.\adb.exe remount
.\adb.exe push 9a5ba575.0 /system/etc/security/cacerts
.\adb.exe shell chmod 644 /system/etc/security/cacerts/9a5ba575.0
.\adb.exe reboot
Once finished, we can set our proxy using the AVD extended controls and now we should be able to intercept and read all the HTTP traffic generated by our virtual device.
Online I read a lot of threads talking about different methods and procedures, but actually, this was the only one that in my case worked consistently.
Having said that, see you next time! Ciao!
-
https://developer.android.com/studio#:~:text=Command%20line%20tools%20only ↩
-
https://developer.android.com/studio/releases/platform-tools ↩
-
https://stackoverflow.com/questions/50420374/how-to-cold-boot-emulators-running-api-27-on-android-studio ↩
-
https://stackoverflow.com/questions/15100251/avd-hardware-buttons-not-enabled ↩
-
https://developer.android.com/studio/run/emulator-networking ↩
-
https://docs.mitmproxy.org/stable/howto-install-system-trusted-ca-android/ ↩